Georeferencing a map using ArcGIS
This process follows the basic principles of georeferencing.
- Input options: Any image file
- Output options: A georeferenced image file - GeoTIFF or JP2
- Strengths: Offers a wide range of input and output image formats. Has an extensive choice of coordinate systems and transformation methods to work in.
- Weaknesses: Uses proprietary software which must be purchased and can take time to learn.
Workflow:
- Open your map in your Image Editing software.
Crop the non-geographic parts of the map; ie. remove the margin areas outside the map boundaries. - Open the ArcMap GIS software.
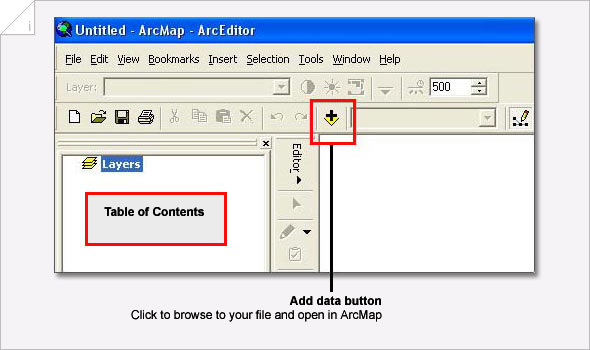
 Use the 'Add Data' button to add the base map layer that you will use to georeference your map.
Click this link to view a list of available georeferenced maps and layers.
Note: When ArcMap is started, the coordinate system for the workspace is not defined. When you add a map with a defined coordinate system, ArcMap will automatically set the workspace's projection to be the same as that of the map. Our georeferenced maps use either the British National Grid and Spherical Mercator coordinate systems. For further information, see Specifying a coordinate system in ArcGIS or our page on Coordinate Reference Systems - Use the 'Add Data' button to add the map you will georeference.
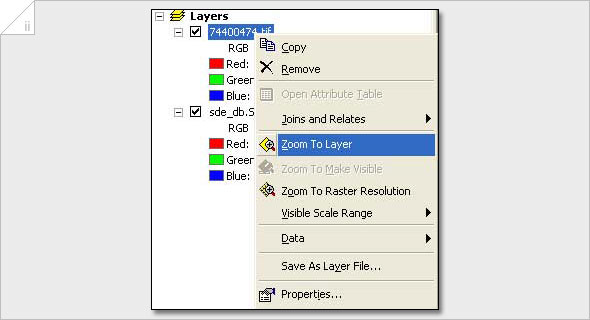
 You now need to zoom to display the whole of your added map.
All maps you add are displayed as layers in the 'Table of Contents' found on the left hand side of the ArcMap workspace. Locate your map layer, right click it, then select 'Zoom to Layer' from the drop-down menu.
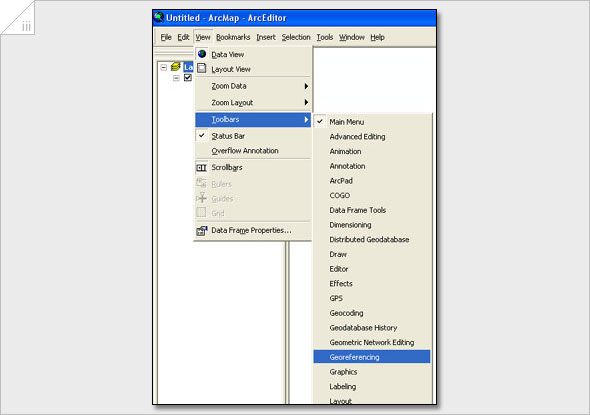
- Before starting to georeference your map, ensure the Georeferencing Toolbar is displayed.
To display the Georeferencing Toolbar, right-click the 'View' menu in the top menu bar, point to Toolbars, and click Georeferencing.
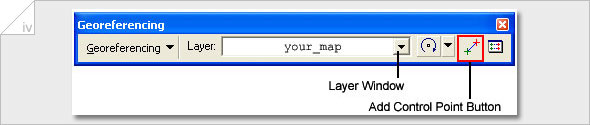
On the Georeferencing Toolbar, make sure the map you want to georeference is displayed in the 'Layer Window'. If it is not, click the arrow and select your map layer from the drop-down menu.
Note: Further information can be read about the Georeferencing Toolbar - To georeference your map you need to add sets of Control Points to move it in to the correct potition.
These sets of Control Points are used to link known locations on your map, and the georeferenced base map you added already.
Use the 'Navigation Tools' to find an area on your map where you want to set a Control Point

Note: If at any time you can't see the 'Navigation Tools' right-click the 'View' menu in the top menu bar, point to Toolbars, and click Tools
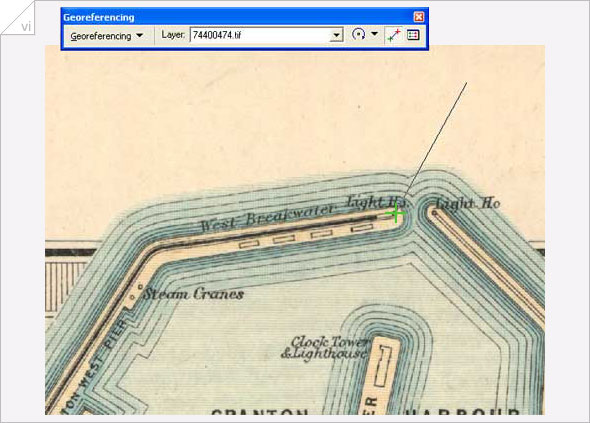
Click the 'Set Control Point' Button on the 'Georeferencing Toolbar'
Set the Source Control Point by clicking once at a chosen point on your map...
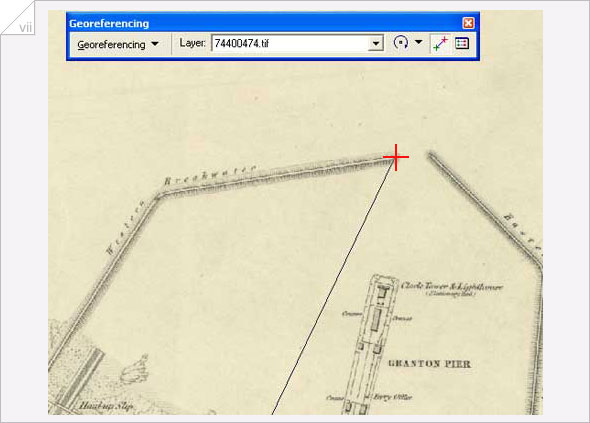
Now set the Destination point at the matching location on your base map...
Remember to use the Zoom to Layer Button and the 'Navigation Tools'  to help locate the point you want to find on the base map.
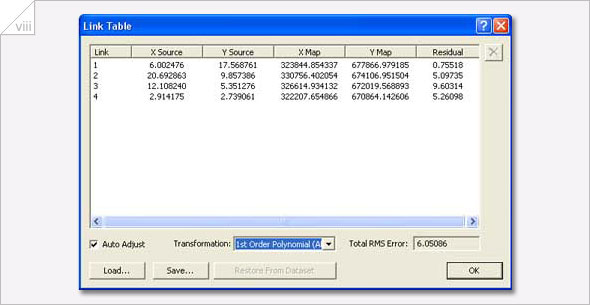
- If you want to view or edit your Control Points after you have set them, click the
 'View Link Table' button on the Georeferencing Toolbar.
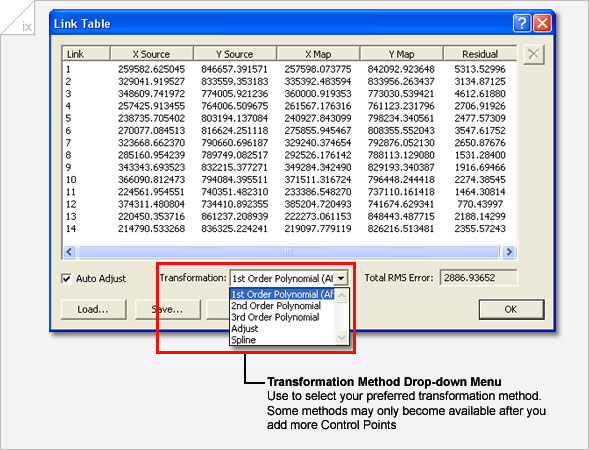
- It is also important to consider the Transformation method that will best suit the georeferencing of your map.
As you add Control Points, your map is automatically transformed based on these points. Three to Four Control Points should be enough to fit your map to the georeferenced base map you are using. For a better fit, you may need to add more points. The number you need to add is usually determined by how accurately the map your are georeferencing was originally drawn.
As you increase the number of Control Points, other Transformation Methods become available in the Transformation drop-down menu found on the Control Point Link Table. These different Transformation Methods interpret your Control Points in different ways, and control how the map you are georeferencing is fitted and warped to you georeferenced base map.
The higher-order spline or adjust polynomial transformations are often best...
The spline transformation, as a true rubber sheeting method, transforms the source control points exactly to the target control points, and optimises for local accuracy, but not global accuracy.
The adjust transformation uses a mixture of the spline and affine transformation, taking account of the control points within a broader context, so optimises for both global and local accuracy.
Geo-referencing is an art as much as a science, and there is often a need to experiment with different numbers of control points and different transformations in order to achieve the best fit for particular maps.
Note: You can stop the map you are georeferencing automatically being transformed as you add new Control Points by unchecking the 'Auto Adjust' check box found on the bottom left of the Link Table. When you want to see your map transformed, just re-check the 'Auto Adjust' check box - When you have finished adding Control Points, and are happy with your georeferenced of your map, select Update Georeferencing from the Georeferencing drop-down menu on the Georeferencing Toolbar.

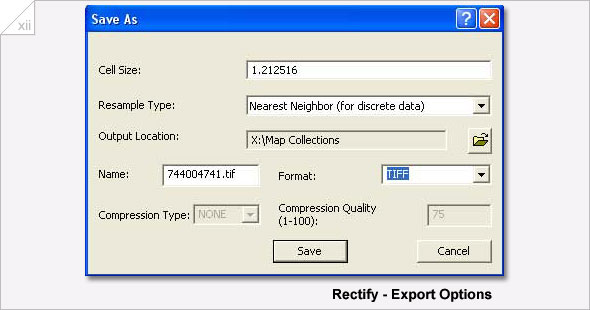
Note: The Updating Georeference command saves your Control Points in a file (.tif.aux.xml). This file is located in the same location on your computer as the map you are georeferencing. By saving this file and keeping it with your map, you can return to your map in ArcMap at any point and add to or alter it's Georeferencing. - Now select Rectify from the Georeferencing drop-down menu on the Georeferencing Toolbar. This will export your map as a new file with its georeferenced information embeded.
We suggest using the TIFF or JPEG2000 (JP2) formats for best quality.
Note: If at any time you can't see the 'Table of Contents' you will find it under Window in the top Menu bar.
This displays the Control Points Link Table.
If you want to delete a point, right click it in the list and select delete. You can also adjust the points by editing their co-ordinates entries in the list.
Note: Make sure you specify where you want your map exported to on your computer using the Output Location dialogue box, and name your new georeferenced map file using the Name dialogue box.
The Georeferencing a Raster Dataset in ArcGIS describes the process fully with illustrations.
The slideshow 'From paper to screen – Putting maps on the web – presentation in Edinburgh in September 2009' illustrates the standard ArcMap georeferencing technique for a map of Edinburgh.